This tutorial will help you understand how to setup Landing Pages and link them to your Sales Funnel.
Start by clicking on Website Setup > Page Editor on the left hand menu. The landing or gateway pages to be created (or any existing pages) will be displayed under the PAGES section at the bottom of the table.

- In order to add or create a new page to the list, click on the Add New button next to PAGES header.
- If you want to edit an existing page you have already created, click on the corresponding page link.

Create a new page or edit an existing one, for both the cases, you can step up or design the page as follows;
Step 1: Enter the basic details of the page, i.e. Title, Meta Description and Meta Keywords (for search purposes).
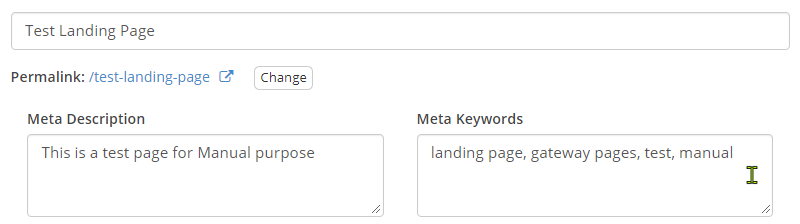
Note: The Permalink is the auto-generated link for the landing page, which you can use it for external linking. It will appear/change upon saving. For an existing page, click on the Change button next to it to edit the same.

Step 2: Next, start with designing the page content in the editor. Make use of the tools and macros to fit in your requirements. The system provides some advanced features to assist your designing. You may like to use them;

- File Uploader: Easy drag and drop files feature, which you help you to upload the files into the system.
- CSS Editor: One-click access to the style sheet, which lets you to design the presentation of the document.
- Templates: Easy access to the available templates (built-in), with the options to edit/over-write the same.
- Paste/edit my own html page: The system would give you a blank area to enter your own HTML to design your own theme, if you do not want to use the default theme, enable the option by simply checking the box.
- Save as template: This is an optional feature to save the design as an template, if you change your mind.


Step 3: Once you have completed designing your page, click on Update (top right) to save/apply the changes.
Notes: Every time you update the page, the system will create a back-up of the the previous content. To view or compare the previous versions of the page, click on the Revision link below the Update button (Publish section).


Access through the Mobile App
All Small Business Dream Tutorials are shown with a Computer view as explained above. This is the easiest and most complete way to Configure your Small Business Dream system, but if you are wanting to configure some areas by using your Mobile App, here are the simple steps to help you get started quickly.
Step 1: On the home page when logging into the Mobile App, you will see Action List and Social Tasks.
Step 2: Click on the menu (3 horizontal lines) at the top left corner of the page to expand the list.
Step 3: Then you will see your Wallet, Store Details (where you can setup and view your store details), Contacts and Manage.
Step 4: Click on the menu item to view and configure that particular area of your system.
Until our Next Lesson on Setting Up your Squeeze Survey!
Happy Dreaming. Yours Truly,
SmallBizDream.com Support and Training Crew
PS: If you want to jump ahead and learn more, you can see the entire training series by clicking here: Tutorial.